


Price Match
Now via Live Chat
Price Match
Now via Live Chat
Free Shipping
When you spend over £50
Free Shipping when you spend over £50
Easy Returns
Just call for a return number
Next Day Delivery
Need it fast?
So you are having issues with your engine running efficiently. You might be suffering from a ‘flat spot’ in your engine rev range or your exhaust is coughing and spluttering. Maybe your engine is running a little hot. Can you touch your dipstick once your engine has warmed up or does it burn your figure tips off? These are all signs that your engine timing is not quite correct. It’s not always the timing that can cause one or more of these problems but it is a good start. So we thought we would show you how to time your engine correctly first time which fingers crossed will sort out your issues.
In order for an engine to work it needs three things. Fuel, air and Spark.
The carburettor pulls in air and fuel and mixes it together to form a fuel vapour. This vapour then travels down the inlet manifold into the inlet ports on each cylinder head. From here the inlet valves open and allow the vapour to enter the combustion chamber of the cylinder head which is where the explosion (combustion) happens.
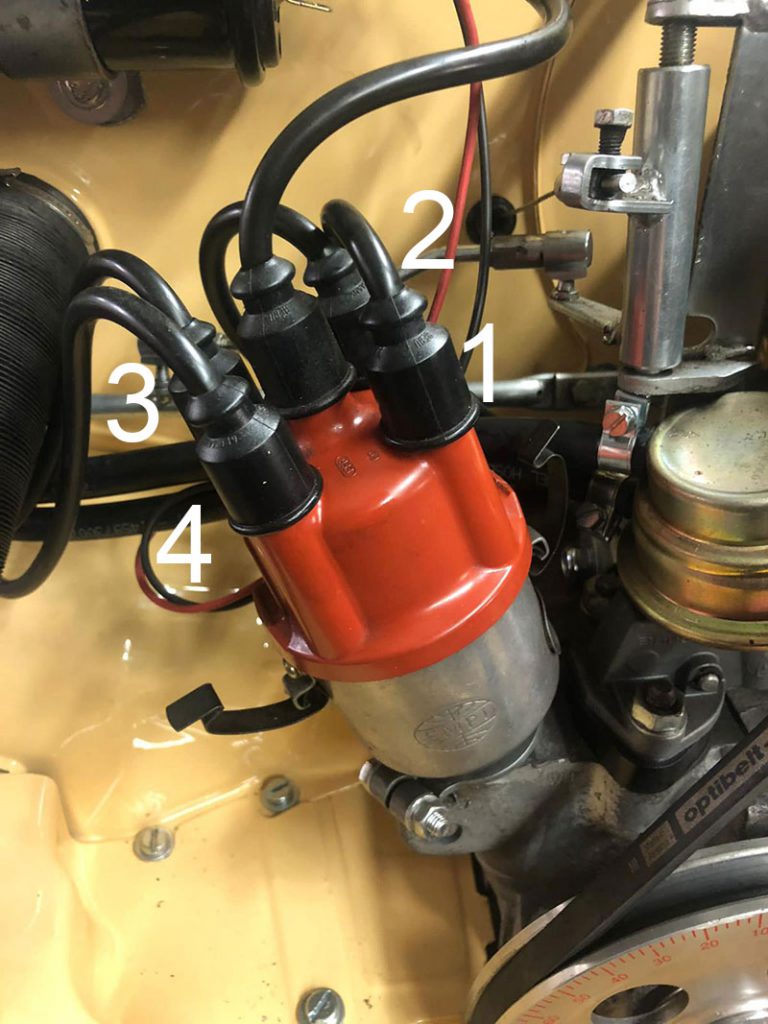
A spark is created by the ignition coil. This coil turns your 12 volts of power into 30’000 Volts of power (standard Bosch Blue Coil output). This 30,000 volts travels down the HT Lead (High Tension Lead) into the top of the distributor. The distributor (as it names suggests) distributes the power in 1 of 4 directions. Position 1 and 2 go to the right hand cylinder head and position 3 and 4 go to the left cylinder head via more HT Leads. At the end of each HT lead is a Spark Plug which ‘sparks’ when the voltage reaches its end.
So what we are trying to achieve is the correct timing that when the spark plug ‘sparks’ there is fuel to ignite and combust. If your timing is not correct then you will either end up with a nice spark but no fuel to ignite or a load of fuel and nothing to ignite it.
There are two types of distributors which can be fitted to your air-cooled VDub. Originally most engines were fitted with a Vacuum advanced distributor, but your engine could also be fitted with a centrifugal distributor with the most popular version being the 009 model. The 009 distributor is very popular with customers which have installed twin carburettors on their engine as it does not require a vacuum take off from the carburettor. Whichever you have the basic principle is the same. As the engine rev’s increase the distributor advances it timing.
When your engine is idling it is turning relatively slowly. The accelerator is closed and very little fuel and air is being sucked into the carburettor and drawn down into the cylinders. Because there is such a small amount of mixture it burns very quickly. Therefore the spark plug needs to spark very close to TDC (top dead centre).
However when you are driving at speed then your engine is turning anything up to 5 times faster than it does at idle. Therefore you will be burning more fuel which takes longer to burn. Because the fuel takes longer to burn it needs to start earlier. Therefore you need to ignite the fuel while the piston is still coming up the cylinder so that it will get the full benefit of the pressure against the piston at the correct time and push it back down the cylinder.
So the distributor therefore changes the timing of the ignition spark depending on how fast the engine is turning.
So first things first, you need to make sure that your valves are opening and closing at the correct time to let the fuel in and the exhaust gases out. Checking and setting your valves is a regular maintenance item for the air cooled VW. It should be done on every service of around 3000 to 5000 miles. The opening and closing of your valves is done by the camshaft inside the engine which unless you have an adjustable cam gear, is not adjustable. But in order to set the timing of your engine, you need to set your engine to TDC (top dead centre) in cylinder number 1 (this is on the right hand side, furthest away from you if you are standing behind the car).
First of all you need to put the car in neutral so that the engine turns freely without moving the wheels. Now look at your crankshaft pulley. You will see the timing notches cut into the rim of the pulley. On the rear of the pulley face you should see a dot near the edge. This dot marks the TDC for cylinder number 1. Take a ruler or straight edge and mark a line with some tipex on the direct opposite side of the pulley. So now you should have two marks on your pulley that are 180 degrees apart on the pulley face.
Now turn your engine counter clockwise by using a socket and ratchet on the pulley nut (either top pulley or bottom pulley) until the dot on the pulley lines up with the seam of the crankcase halves. Now take off your distributor cap and verify that the rotor arm is in the position to fire cylinder number 1 (see which HT Lead the rotor would be pointing to if the cap was still on). If your rotor is pointing to number 1 and the dot is in the correct position, then you are good to go. If not, then turn the pulley 360 degrees at a time until you are in the correct position.
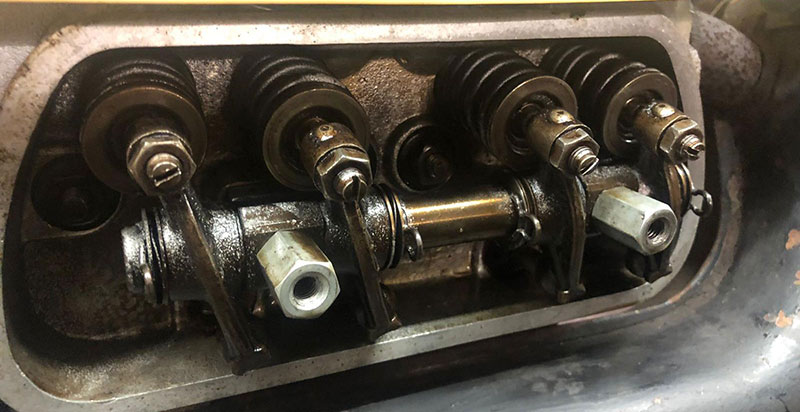
So now you are in TDC for cylinder number 1, you need to check that your valves are in the correct position. If all has been done correctly then the two valves on cylinder number 1 should both be closed. If they are both not in exactly the same position, then you have done something wrong. So go back a bit and repeat until it is correct. If it is correct then you should be able to wiggle the rocker arms on both of these valves and you should feel a little bit of movement. It won’t be much, but you should be able to feel it.
Ok, so now you are ready to check your valve clearance. Take out your trusty feeler gauge and the .006” blade. Push the rocker arm at the bottom to make sure that the pushrod is fully seated in the cup. Then stick your .006” feeler gauge into the gap between the end of the valve and the rocker arm. You should be able to slide it in the gap with a little bit of friction. If it is hard to push through then the valve clearance is too tight. If it slides through without any friction, then the valve is loose.
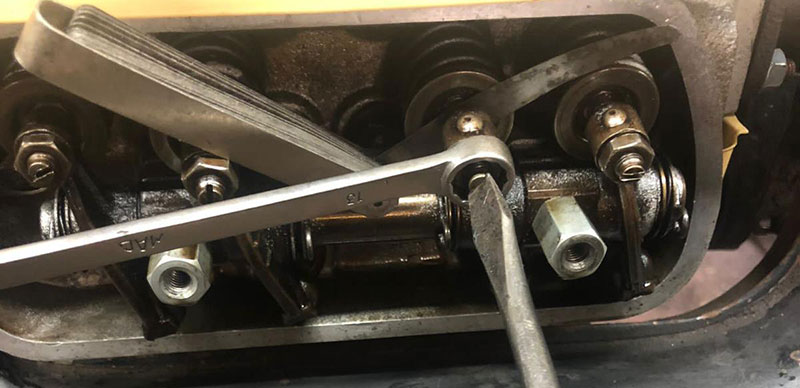
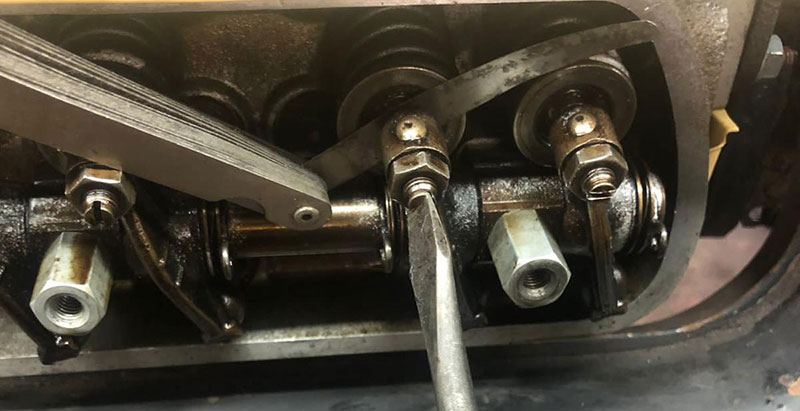
To adjust your clearance then you will need to take a 13mm spanner and undo the nut on the end of the tappet (which locks it to the rocker shaft to stop it moving). Once this nut is loose then you can use a small flat head screwdriver to turn the tappet in or out until the clearance is correct. Once you are happy then tighten the 13mm nut up again to lock the tappet in position.
Now double check your work. Make sure that now the nut is tight the clearance is still correct.
Happy?
So now you need to rotate the engine counter-clockwise 180 degrees. This will move the 2nd cylinder to TDC (the cylinder that is behind the one you have just done).
Now perform the same checks on cylinder number 2 which you did on cylinder number 1.
Once this is done, you can then turn the engine another 180 degrees counter-clockwise and check cylinder number 3, then another 180 degrees counter-clockwise and check cylinder number 4.
So now you are happy that all your valve clearances are set correctly you can put your rocker covers back on with some new gaskets and we can turn our attention to the engine ignition timing.
The next step is to set your points gap. Changing your points gap will change your timing so before you do anything else make sure that your points gap is set correctly.
Timing an air-cooled VW engine can be done either statically or dynamically. However because the distributor adjusts the timing depending on speed then the most efficient way of timing your engine by far is dynamically. So therefore invest in a good quality adjustable timing gun so you can get your timing spot on.
What you are trying to achieve is an engine that ignites the fuel at the correct time.
If your timing is too advanced then the spark plug will spark too early. The combustion will therefore happen while the piston is still coming up towards the cylinder head. Trying to start an engine with advanced timing is very hard as the starter motor will try and turn the engine clockwise but the ignition will be trying to turn the engine anti-clockwise as it is pushing the combustion against a rising piston.
On the other hand if your timing is too retarded then the spark plug will spark too late. The combustion will therefore happen while the piston is travelling downwards towards the crankcase. The combustion will be chasing the piston down the bore instead of actually pushing the piston.
Connect your timing light to your car battery and then simply connect the third wire on the timing light around the HT lead which connects to cylinder number 1.
Now start the engine and you should be able to see the timing mark on your crankshaft pulley with the strobe light. The correct position for this timing mark when the engine is idling is directly in line with the centre of the crankcase (look for the line where the crankcase joins together, this is the centre). If it does not line up with this line then you will need to adjust the distributor by turning it.
Take a 10mm spanner and loosen the nut on the distributor clamp. Once it is lose you will be able to rotate the distributor. Keep an eye on your timing mark and as you turn the distributor you will notice the mark move. Once you have the mark in line then you have basically timed your engine.
We want to know what your engine is doing at speed when your distributor has advanced itself. Now the easiest way by far is to get yourself a bottom pulley which has the degree markings all the way around the circumference of the pulley. They can be installed quite easily and start at a reasonable price. There are a range of colours and designs available so pick one that you like. It will make this next job much easier.
Assuming that you have a degree pulley installed now rev the engine until it is at maximum advance. This is normally around 2500RPM – 3000RPM. You will know when it stops advancing by looking at your timing light against the pulley. Below the centre of the crankcase the number on you degree pulley should get to around 32 degrees (ish) and then go no further no matter how much you rev the engine. This is its maximum advance.

You are ideally looking for your engine to be set at 32 degrees BTDC (Before Top Dead Centre) at maximum advance. So turn your distributor until it sits at around 32 degrees. Then let off the revs so the engine is idling again. Now check your timing at idle. Is the engine running properly or is it struggling to run?
If it is struggling or is now idling way off the standard 7 degrees at idle then turn the distributor again. Remember we are trying to achieve good running at speed but we don’t want the engine to cut out when you get to a set of traffic lights and it goes onto idle. It is trying to get a good balance.
If you can’t get the engine to work efficiently at both idle and a maximum advance then it could be an issue with your distributor. If you have a vacuum advance distributor then make sure the vacuum unit is working properly and that all of your vacuum hose is in good order. If you have a 009 distributor then check the springs inside the distributor are in good condition and working order. These can stretch over time and may need adjusting or replacing.
If you are struggling to get the engine to run after all of this then it maybe a carburettor issue which we will discuss setting up in a future blog.
Special thanks to James at Vee Dubs for the pictures taken in this blog. If you require any work carried out on your Vee Dub in the London, South East Area then Vee Dubs is Located in Welling (DA16). James can be contacted via email vee-dub@btconnect.com
Please note that whilst every attempt is made to ensure that these instructions are as clear and correct as possible, we cannot be held responsible for misinterpretation of these instructions or for any subsequent accident or damage caused through misfitted parts.